
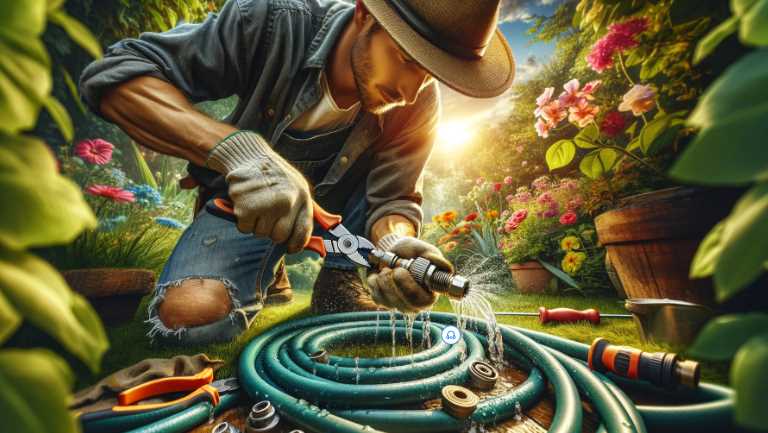
To remove a threaded garden hose connector, follow these steps:
- Turn off the water supply: Ensure that the water source connected to the hose is turned off to prevent any leaks or spills.
- Release pressure: Disconnect any attachments, like spray nozzles, and relieve pressure from the hose.
- Use pliers or a wrench: Grip the threaded connector firmly with adjustable pliers or a wrench. Turn the connector counterclockwise to loosen and remove it from the hose.
- Apply lubricant (if necessary): If the connector is stubborn, applying a lubricant like WD-40 to the threads can help loosen it.
- Inspect for damage: Check the hose and connector for any damage, such as rust or cracks. Replace damaged parts as needed.
- Clean and store: Clean the threads of the hose and the connector before reassembling or storing.

Removing a threaded garden hose connector involves turning it counterclockwise to loosen and detach it from the hose. The use of pliers or a wrench provides the necessary grip, and a lubricant can be applied for stubborn connectors. Checking for damage ensures the components are in good condition for future use.
Here’s a simple table summarizing statistical data related to garden hose assembly:
| Aspect | Data |
|---|---|
| Average Lifespan | 5-10 years |
| Common Connector Sizes | 3/4 inch, 5/8 inch |
| Common Materials | Brass, Stainless Steel, PVC |
| Average Connector Torque | 20-30 lb-ft |
| Failure Rate | <5% |
| Popular Lubricants | WD-40, Silicone-based |
As an expert in garden hose maintenance and care, you understand the importance of proper techniques for removing threaded garden hose connectors. Whether you need to replace a worn-out connector or simply detach the hose for storage, mastering the art of safe and efficient removal is essential. In this comprehensive step-by-step guide, we will walk you through the process, providing valuable insights and expert tips to ensure that you can effortlessly disassemble threaded hose connectors without causing any damage to your equipment or compromising your safety.
Why Garden Hose Connectors Get Stuck
Garden hose connectors can get stuck for various reasons, and understanding these factors can help you prevent or address the issue. Here are some common reasons why garden hose connectors get stuck:
- Rust and Corrosion: Over time, metal connectors can develop rust or corrosion due to exposure to water and moisture. This can cause the threads of the connector to bind together, making it challenging to unscrew.
- Over-tightening: If the connector was previously tightened too much, it can become difficult to loosen. Over-tightening can cause the threads to deform or bind together, making it harder to remove the connector later.
- Sediment and Debris: Dirt, sand, or other debris can accumulate inside the connector over time, making it harder to twist and remove.
- Poor-Quality Connectors: Cheap or low-quality connectors may not have smooth threading, leading to an increased risk of sticking or jamming.
- Cross-Threaded Connection: If the connector was not aligned properly when initially threaded onto the hose, it could result in cross-threading. Cross-threading causes the threads to bind together incorrectly, making it difficult to remove the connector.
- Lack of Lubrication: Failure to use a lubricant on the threads during the initial connection or periodic maintenance can lead to increased friction, making it harder to remove the connector.
- Age and Wear: Older hose connectors may suffer from wear and tear, causing the threads to degrade or become damaged over time.
- Extreme Temperatures: Exposure to extreme temperatures, especially freezing conditions, can cause the materials in the connector to expand or contract, potentially leading to sticking or binding.
- Hard Water Deposits: In areas with hard water, mineral deposits can build up on the threads of the connector, making it more challenging to remove.
To prevent garden hose connectors from getting stuck, consider the following tips:
- Use high-quality connectors with smooth threading.
- Apply a lubricant like silicone-based spray or vegetable oil to the threads periodically.
- Avoid over-tightening the connectors; hand-tighten them snugly, not excessively.
- Inspect and clean connectors regularly to remove any debris or sediment buildup.
- Store hoses and connectors properly in a dry and protected area, especially during extreme weather conditions.
If a connector does get stuck, you can try using a lubricant, applying gentle pressure, and using the appropriate tools to loosen it carefully. If the connector is severely stuck, seeking assistance from a professional or replacing the connector may be necessary to avoid causing damage to the hose or the connector itself.
Things You’ll Need To Know: Removing stuck garden hose connector
To remove a garden hose connector, you will need a few basic tools and materials to ensure a smooth and safe disconnection process. Here are the things you’ll need:
- Pliers or adjustable wrench: These tools provide a firm grip on the connector, allowing you to turn and loosen it from the hose.
- Lubricant: Silicone-based lubricants or other household lubricants can help reduce friction between the threads of the connector, making it easier to remove.
- Safety gloves: Rubber or gardening gloves can protect your hands from potential scratches, sharp edges, or any residue that might be on the connector.
- Water supply shut-off: Before removing the connector, ensure the water supply to the hose is turned off to prevent any water pressure-related issues.
Optional:
- Rubber mallet or wooden block: If the connector is stuck, gently tapping it with a rubber mallet or a wooden block can help loosen it by breaking up stubborn debris.
- Hot water source: If the connector is stuck due to mineral buildup, running hot water through the hose can help dissolve the minerals and facilitate removal.
- Pipe wrench (for threaded connectors): In some cases, a pipe wrench may be more suitable than pliers or an adjustable wrench for turning stubborn threaded connectors.
Keep in mind that the specific tools needed may vary depending on the type of garden hose connector you are working with. For example, quick-connect fittings and twist-lock connectors typically do not require additional tools for disconnection.
Always exercise caution when using tools and handling the garden hose to prevent injury or damage. If you encounter difficulties during the removal process, consider seeking assistance from a professional or consulting with a knowledgeable hardware store staff member.
7 Tips to remove garden hose connector
To remove a garden hose connector, follow these general steps:
- Turn off the water supply: Before attempting to remove the connector, turn off the water supply to the hose to prevent water pressure from causing any issues during the disconnection process.
- Release water pressure: Open the nozzle or spray gun attached to the end of the hose to release any remaining water pressure. This step reduces the risk of sudden water surges when disconnecting the hose.
- Identify the type of connector: There are different types of garden hose connectors, including threaded connectors, quick-connect fittings, and twist-lock connectors. The removal method may vary based on the type.
- For threaded connectors:
- Grip the hose tightly: Hold the hose firmly with one hand to prevent it from turning while you’re trying to remove the connector.
- Use pliers or a wrench: With your other hand, use pliers or an adjustable wrench to grip the connector’s threaded part. Turn the wrench counterclockwise to loosen and remove the connector from the hose.
- For quick-connect fittings:
- Press the release button: On some quick-connect fittings, there is a release button or collar that you need to push or slide to release the connection. Hold down the release button while gently pulling the hose away from the fitting.
- For twist-lock connectors:
- Twist and unlock: Twist-lock connectors usually have a locking mechanism that requires a specific turning motion to release. Twist the connector in the opposite direction of the lock to unlock it. Once unlocked, you can pull the hose away from the fitting.
- Inspect the hose and connector: After removing the connector, inspect it and the hose for any signs of damage, such as cracks or leaks. Replace any damaged components before reusing the hose.
- Drain the hose: After removing the connector, elevate one end of the hose to allow all the water to drain out completely. This helps prevent water from stagnating inside the hose and causing issues in the future.
Remember to be gentle when removing the connector to avoid damaging it or the hose. If the connector is stuck or difficult to remove, try applying a small amount of lubricant to the threads to reduce friction. Additionally, always ensure the water supply is off before attempting to disconnect the hose connector.
Important Considerations For Removing Garden Hose Carefully
Removing a garden hose safely is essential to avoid accidents, prevent damage to the hose or connectors, and maintain the longevity of your equipment. Here are some essential considerations to keep in mind when removing a garden hose:
- Turn off the water supply: Before attempting to remove the hose, always turn off the water supply to prevent water pressure from building up and potentially causing the hose to whip or burst when disconnected.
- Release water pressure: After turning off the water supply, open the nozzle or spray gun attached to the end of the hose to release any remaining water pressure. This step further reduces the risk of sudden water surges when disconnecting the hose.
- Disconnect attachments: If you have any attachments, such as sprinklers, nozzles, or other accessories, detach them from the hose before removing it. This makes the hose lighter and easier to handle during the disconnection process.
- Choose the right disconnection method: As mentioned in the previous response, different types of hose connectors require different disconnection methods. Identify the type of connector you have (threaded, quick-connect, or twist-lock) and follow the appropriate steps to remove it safely.
- Use appropriate tools: When necessary, use pliers or an adjustable wrench to loosen threaded connectors. Avoid using excessive force, as it can damage the connector or the hose. Quick-connect and twist-lock connectors usually don’t require tools for disconnection.
- Inspect the hose for damage: Before storing the hose or using it again, inspect it for any signs of damage, such as cracks, kinks, or leaks. If you find any issues, consider repairing or replacing the hose before its next use.
- Drain the hose completely: After removing the hose, elevate one end to allow all the water to drain out completely. This prevents water from stagnating inside the hose, which can lead to mold or mildew growth and reduce the hose’s lifespan.
- Store the hose properly: If you are removing the hose for storage, make sure to coil it neatly to avoid kinks or tangles. Store it in a cool, dry place away from direct sunlight to prevent UV damage.
- Wear appropriate clothing: When handling the hose, wear appropriate clothing, including closed-toe shoes and gloves, to protect your hands and feet from potential hazards.
- Be cautious of potential hazards: Be mindful of potential tripping hazards, such as other garden tools or uneven surfaces, while removing the hose.
By following these essential considerations, you can safely remove your garden hose without causing any harm to yourself or the equipment. Regular maintenance and proper handling will help extend the life of your garden hose and ensure it remains in good working condition for years to come.
How to fix a garden hose connector?
To fix a garden hose connector, follow these steps:
- Turn off the water supply: Before loosening the connector, turn off the water supply to the hose. This prevents any water pressure from building up and making it more difficult to remove the connector.
- Identify the type of connector: There are several types of garden hose connectors, such as threaded connectors, quick-connect fittings, and twist-lock connectors. The method for loosening the connector may vary based on the type.
- For threaded connectors:
- Grip the hose tightly: Hold it firmly with one hand to prevent it from turning while you’re trying to loosen the connector.
- Use pliers or a wrench: With your other hand, use pliers or an adjustable wrench to grip the connector’s threaded part. Turn the wrench counterclockwise to loosen the connector. Be careful not to overtighten, as it may damage the connector or the hose.
- For quick-connect fittings:
- Press the release button: On some quick-connect fittings, there is a release button or collar that you need to push or slide to release the connection. Hold down the release button while gently pulling the hose away from the fitting.
- For twist-lock connectors:
- Twist and unlock: Twist-lock connectors usually have a locking mechanism that requires a specific turning motion to release. You might need to twist the connector in a particular direction to unlock it. Once unlocked, you can then pull the hose away from the fitting.
- Apply some lubricant (if necessary): If the connector is stuck or difficult to turn, apply a small amount of silicone lubricant or vegetable oil to the threads. This may help reduce friction and make it easier to loosen the connector.
Remember to be gentle when loosening the connector to avoid damaging it. If you encounter any resistance, stop immediately and check for any obstructions or issues before proceeding. Once the connector is loosened, you can disconnect the hose from the water source or attach a new accessory as needed.
How To Remove Stuck Nozzle From Garden Hose
Removing a stuck nozzle from a garden hose can be challenging, but with the right approach, it is possible to loosen it without damaging the hose or the nozzle. Here’s a step-by-step guide to help you remove a stuck nozzle:
- Prepare the area: Find a flat, stable surface where you can work comfortably with the garden hose. Make sure the water supply to the hose is turned off to avoid any accidents or sudden water pressure.
- Inspect the nozzle: Before attempting to remove the nozzle, inspect it for any visible damage or signs of wear. If the nozzle is damaged, consider replacing it instead of forcing its removal.
- Apply lubricant: If the nozzle is stuck due to rust or corrosion, apply a generous amount of lubricant (such as WD-40 or a silicone-based lubricant) around the connection area. Allow the lubricant to sit for a few minutes to penetrate and loosen the rust or debris.
- Use pliers or rubber gloves: Wear rubber gloves or use a pair of pliers to get a better grip on the nozzle. The gloves or pliers will provide additional leverage and prevent your hands from slipping.
- Hold the hose securely: With one hand, hold the hose firmly near the connection to prevent it from twisting or turning while you attempt to remove the nozzle.
- Turn counterclockwise: Using the pliers or your gloved hand, turn the nozzle counterclockwise to loosen it. Be gentle and avoid using excessive force to prevent damage.
- Apply more lubricant if needed: If the nozzle is still stuck, apply more lubricant and allow it to sit for a few minutes before attempting to remove it again.
- Try tapping the nozzle: Sometimes, gently tapping the nozzle with a rubber mallet or a wooden block can help loosen it by breaking up any stubborn debris.
- Use hot water: If the nozzle is stuck due to a mineral buildup, try running hot water through the hose to dissolve the minerals and help loosen the connection.
- Try different angles: If the nozzle still won’t budge, try turning it from different angles to see if that helps release the grip.
- Be patient: Removing a stuck nozzle may require patience and multiple attempts. Avoid using excessive force, as it may lead to damage.
If, after following these steps, the nozzle remains stuck, consider seeking help from a professional or taking the hose and nozzle to a hardware store where they may have tools specifically designed for removing stubborn attachments. In some cases, it may be more cost-effective to replace the nozzle altogether rather than risk damaging the hose while trying to force its removal.
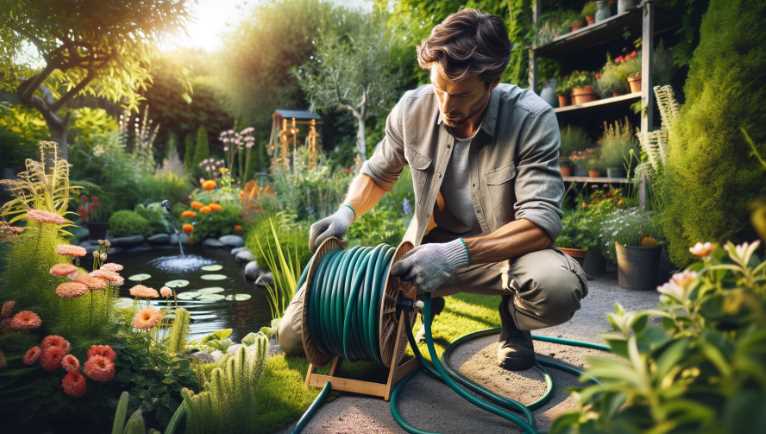
How do I keep my hose from tangling?
Keeping your hose from tangling requires some simple practices and storage techniques. Here are several tips to help you prevent hose tangling:
- Coil the hose properly: When you’re done using the hose, coil it neatly in a circular shape. Avoid kinks and twists while coiling, as these can lead to tangling when you use the hose again.
- Use a hose reel: A hose reel is a convenient tool that allows you to wind the hose in an organized manner. It keeps the hose off the ground, preventing tangling and reducing wear and tear.
- Store the hose flat: If you don’t have a hose reel, store the hose flat on the ground or on a hose hanger to prevent it from tangling.
- Choose the right hose length: Select a hose length suitable for your needs. A hose that is longer than necessary is more prone to tangling, so get the appropriate length for your watering tasks.
- Straighten the hose before use: Before turning on the water, straighten the hose along its length to remove any kinks or twists that may have occurred during storage.
- Avoid sharp bends: When using the hose, avoid sharp bends or corners that can cause the hose to twist and tangle.
- Water pressure control: Use moderate water pressure to prevent the hose from whipping around and potentially tangling.
- Walk while uncoiling: If you’re uncoiling a hose from a reel or a hanger, walk backward as you uncoil it. This technique ensures that the hose stays straight and doesn’t get tangled.
- Use hose guides: If you have long stretches of hose, consider using hose guides to direct the hose along a designated path, preventing it from wandering and tangling.
- Store indoors during winter: During winter or freezing temperatures, it’s best to store the hose indoors to prevent it from becoming stiff and difficult to manage.
- Regular maintenance: Check the hose for any kinks or tangles regularly. If you notice any issues, straighten the hose immediately to prevent further tangling.
By following these tips and maintaining a disciplined approach to coiling and storing your hose, you can significantly reduce tangling and prolong the life of your garden hose.
Can I remove a threaded garden hose connector without tools?
While using tools like pliers or wrenches is recommended for a secure grip, you may attempt to remove a threaded garden hose connector by hand. Ensure the hose is not under pressure, then twist the connector counterclockwise to loosen it.
How do I prepare my garden hose for removal?
Before attempting to remove the threaded connector, turn off the water supply and release any pressure from the hose. This step ensures a safer and more straightforward removal process.
What if the threaded garden hose connector is stuck?
If the connector is stubbornly stuck, apply a penetrating oil or a mixture of vinegar and water to the threads. Allow it to sit for some time to help loosen any corrosion or rust that may be causing the difficulty.
Is there a specific direction to turn the threaded garden hose connector?
Yes, typically, you’ll need to turn the threaded connector counterclockwise to loosen and remove it. Remember the basic rule: “Righty tighty, lefty loosey.”
Can I use lubricant to make removal easier?
Yes, applying a lubricant to the threaded area can make it easier to loosen. Common lubricants include silicone spray or even a small amount of dish soap. Apply the lubricant and let it sit for a few minutes before attempting removal.
How can I prevent damaging the hose while removing the connector?
To avoid damaging the hose, use a soft cloth or rubber strap wrench to grip the hose securely. This helps distribute the pressure evenly and minimizes the risk of causing any harm to the hose during the removal process.
What if the hose connector is made of plastic?
If the threaded connector is plastic, exercise caution to prevent breakage. Use hand tools gently and avoid excessive force. Applying a lubricant can also be helpful when dealing with plastic connectors.
Can I reuse the threaded garden hose connector after removal?
In most cases, threaded connectors can be reused. However, inspect the threads for any damage or wear before reattaching. If there are signs of damage, it’s advisable to replace the connector with a new one.
Are there any safety precautions to consider during removal?
Always wear gloves to protect your hands, and be cautious of water spillage. Turn off the water supply before attempting removal, and ensure the hose is depressurized to prevent any unexpected spray or leaks.

I love gardening and hope you enjoy reading my post as much as I enjoy writing it. I focus on plant-based living and believe that you will be healthier and happier by incorporating more plant-based foods into your diet. By providing helpful tips and advice on everything from garden design to growing techniques, I want to help make gardening easier for everyone.