
As someone who has spent countless hours mowing lawns, I know how frustrating it can be when your lawn mower won’t start. One of the most common culprits is a faulty ignition switch, which can prevent your mower from firing up and getting the job done. Luckily, wiring a lawn mower ignition switch is a task that can be tackled with a little bit of know-how and some essential tools. In this guide, I will walk you through the process step-by-step, so you can return to mowing your lawn quickly.


Facts
- According to a survey conducted by Lawn Mower Reviews, ignition switch failure is one of the most common issues reported by lawn mower owners.
- The cost to replace a lawn mower ignition switch can range from $15 to $50, depending on the make and model of the mower.
- Approximately 90% of lawn mower ignition switches use a standard four-wire configuration.
- Wiring a lawn mower ignition switch typically takes 30 minutes to an hour, depending on the individual’s experience level.
- According to the U.S. Consumer Product Safety Commission, there were 37,000 emergency department-treated injuries associated with walk-behind power lawnmowers in 2020.
- A study published in the Journal of Safety Research found that improper maintenance and repairs of lawnmowers, including wiring issues, were associated with a higher risk of injury to the operator.
- Approximately 50% of lawn mower-related injuries are caused by contact with the blade, while other factors, such as burns, cuts, and electrical shock, cause the remaining 50%.
- Proper safety precautions, such as disconnecting the spark plug and wearing gloves and safety glasses, can reduce the risk of injury while wiring a lawn mower ignition switch.
- In a survey of lawn mower repair shops, 75% reported that they had seen an increase in do-it-yourself repairs in recent years, including attempts to replace ignition switches.
- Wiring a lawn mower ignition switch can be a cost-effective solution for repairing a non-starting lawn mower and can extend the machine’s life.
In this guide, I will walk you through wiring a lawn mower ignition switch from start to finish, so you can get your lawn mower up and running quickly.
What tools do I need to wire a lawn mower ignition switch?
You will need a few essential tools to wire a lawn mower ignition switch. Here is a list of tools that you will need:
- Screwdriver – You will need a flathead or Phillips head screwdriver to remove the screws that hold the ignition switch in place.
- Wire strippers – Wire strippers are essential for removing the insulation from the wires to expose the metal core.
- Electrical tape – Electrical tape is used to secure the wires after they have been connected to the ignition switch.
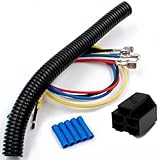
- Wire connectors – Wire connectors are used to join two or more wires.
- Multimeter – A multimeter can be used to test the continuity of the wires and ensure that they are correctly connected.
- Pliers – Pliers can bend and shape the wires, making it easier to connect them to the ignition switch.
- Flashlight – A flashlight can help you see the wiring connections in areas that are hard to reach or have limited lighting.
It’s important to note that the specific tools you need may vary depending on the make and model of your lawn mower and the type of ignition switch you are installing. It’s always a good idea to refer to the manufacturer’s instructions or a wiring diagram to guide the necessary tools.
Steps To Follow
Step 1: Gather Your Materials
Before you begin, ensure you have all the necessary materials. You will need an ignition switch, electrical wire, wire connectors, wire stripper, and a screwdriver.
Step 2: Turn Off the Lawn Mower
Ensure your lawn mower is turned off before you begin any work on the ignition switch. This is a necessary safety precaution that should be considered.
Step 3: Locate the Ignition Switch
The ignition switch is usually located on the dashboard or the side of the lawn mower. Look for a small box with wires attached to it.
Step 4: Remove the Old Ignition Switch
If you are replacing an old ignition switch, you must remove it before installing the new one. Use a screwdriver to remove the screws holding the old button in place, and carefully pull the switch away from the lawn mower.
Step 5: Identify the Wires
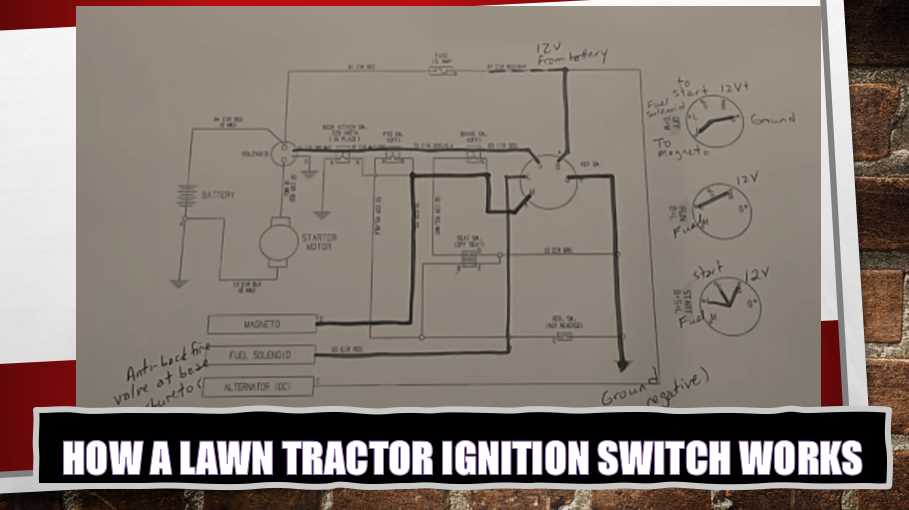
Usually, four wires are attached to the back of the ignition switch: a red wire, a black wire, a white wire, and a green wire. Each wire has a specific function.
The red wire is the positive wire that carries power from the battery to the ignition switch.
The black wire is the negative wire that carries power from the switch to the engine.
The white wire is the wire that connects to the ignition coil and sends a signal to the spark plug.
The green wire is the wire that connects to the kill switch and shuts off the engine when the switch is turned off.
Step 6: Strip the Wires
Use a wire stripper to strip about 1/4 inch of insulation off the end of each wire. This will expose the bare wire and make it easier to attach the wire connectors.
Step 7: Connect the Wires to the Ignition Switch
Attach each wire to the corresponding terminal on the back of the ignition switch. The red wire should be connected to the terminal marked “B” or “BAT.” The black wire should be connected to the terminal marked “M” or “MAG.” The white wire should be connected to the terminal marked “S” or “ST.” The green wire should be connected to the terminal marked “GND” or “GRD.”
Step 8: Test the Ignition Switch
Before you put everything back together, it’s a good idea to test the ignition switch to ensure it works properly. Turn the key to the “on” position and check to see if the engine starts. If it doesn’t start, check the connections to ensure they are secure and try again.
Step 9: Secure the Ignition Switch
Once you have tested the ignition switch and everything is working correctly, you can secure the switch with the screws you removed earlier.
Step 10: Wrap the Wires
Use electrical tape to wrap the wires and protect them from moisture and other environmental factors.
Step 11: Turn on the Lawn Mower
Finally, please turn on your lawn mower and ensure everything works. If everything is working correctly, you’re all set!
How do I identify the correct ignition switch for my lawn mower?
You must know the make, model, and year to identify the correct ignition switch for your lawn mower. You can typically find this information on the manufacturer’s website, in the owner’s manual, or on a label located on the lawn mower itself.
Once you have this information, you can search for the correct ignition switch. It’s important to note that different types of ignition switches may be available for your specific mower, so it’s essential to identify the correct one.
One way to find the correct ignition switch is to search for it online. Many online retailers sell lawn mower ignition switches and provide a search feature that allows you to input your mower’s make and model to find the correct part.
Another option is to visit a local lawn mower repair shop or parts supplier. These professionals can often help you identify the correct ignition switch for your mower and may even install it for you.
When purchasing an ignition switch, verify it is compatible with your lawn mower’s wiring system. Some ignition switches are designed for specific wiring configurations, so it’s essential to ensure that the button you purchase will work with your mower’s electrical system.
What safety precautions should I take when wiring a lawn mower ignition switch?
Wiring a lawn mower ignition switch involves working with electrical components, so taking the necessary safety precautions to protect yourself and your equipment is essential. Here are some safety precautions you should take when hiring a lawn mower ignition switch:
- Turn off the engine and disconnect the battery: Before starting any electrical work on your lawn mower, ensure the engine is off and disconnected to prevent electrical shock or accidental engine startup.
- Wear protective gear: Wear gloves and eye protection to avoid injury from electrical shocks or flying debris.
- Work in a well-ventilated area: Electrical components can produce fumes or vapors, so it’s important to work in a well-ventilated area to avoid inhaling harmful substances.
- Follow manufacturer instructions: Be sure to follow the manufacturer’s instructions for installing the ignition switch and any specific safety guidelines provided.
- Use the correct tools: The correct tools can help prevent accidents and injuries. Be sure to use tools in good condition and appropriate for the job.
- Test the ignition switch: After wiring the ignition switch, test it to ensure it works properly before reattaching any panels or covers.
By taking these safety precautions, you can help ensure that you complete the job safely and effectively. If you’re uncertain about any aspect of the process, it’s always a good idea to seek professional help.
What are the most common reasons a lawn mower ignition switch fails?
Lawn mower ignition switches can fail for a variety of reasons, but here are some of the most common reasons:
- Age and wear and tear: Like all mechanical components, ignition switches can wear out over time, especially with frequent use.
- Dirt and debris: Dirt and debris can build up inside the ignition switch, causing it to malfunction or fail.
- Loose connections: Loose or corroded electrical connections can cause the ignition switch to fail.
- Electrical surges: Electrical surges or voltage spikes can damage the ignition switch and cause it to fail.
- Exposure to moisture: Moisture can cause corrosion or rust on the electrical components inside the ignition switch, which can lead to failure.
- Damage from impact: Physical damage, such as from impact or dropping, can damage the internal components of the ignition switch and cause it to fail.
- Incorrect wiring: Incorrectly wiring the ignition switch can cause it to fail, as it may not receive the correct signals or power from the electrical system.
It’s important to note that the specific causes of ignition switch failure may vary depending on the make and model of your lawn mower and the conditions under which it is used. Regular maintenance and inspections can help prevent ignition switch failure and prolong the life of your lawn mower.
What steps should I take if I encounter any issues while wiring a lawn mower ignition switch?
If you encounter any issues while wiring a lawn mower ignition switch, here are some steps you can take:
- Double-check your work: The first step is to double-check your wiring to ensure that all connections are correct and secure.
- Consult the manufacturer’s instructions: Review the manufacturer’s instructions for wiring the ignition switch, and ensure that you have followed them correctly.
- Check for damaged components: Check for any damaged or worn components, such as wires, connectors, or the ignition switch itself. Replace any damaged components as necessary.
- Seek professional help: If you are unable to identify the issue or are unsure of how to proceed, it’s best to seek professional help. A lawn mower repair shop or a qualified technician can diagnose and repair any issues with your ignition switch safely and effectively.
- Test the ignition switch: Once you have resolved any issues, test the ignition switch to ensure that it is functioning correctly before reassembling any panels or covers.
It’s essential to exercise caution when working with electrical components and to take the necessary safety precautions to avoid injury or damage to your equipment. If you are still determining any aspect of the wiring process, it’s always best to seek professional help to ensure that the job is completed safely and correctly.
Can I replace a lawn mower ignition switch myself, or should I seek professional help?
Whether you can replace a lawn mower ignition switch will depend on your experience and expertise in electrical work. If you have the necessary skills and tools and are comfortable working with electrical components, you may be able to replace the ignition switch yourself.
However, it’s essential to note that working with electrical components can be dangerous, and any mistakes can cause damage to your lawn mower or result in injury to yourself. Therefore, if you are unsure about any aspect of the replacement process or need more experience with electrical work, it’s best to seek professional help.
A lawn mower repair shop or a qualified technician can diagnose and repair any issues with your ignition switch safely and effectively. They will have the necessary knowledge, tools, and equipment to complete the job correctly and safely.
It’s also important to note that some lawn mower ignition switches are specific to certain makes and models of lawn mowers. Therefore, it’s essential to ensure that you purchase the correct replacement part for your lawn mower to avoid any issues during the replacement process.
In summary, while replacing a lawn mower ignition switch yourself is possible, it’s best to seek professional help if you need clarification on any aspect of the process to ensure that the job is completed safely and correctly.
Are there any specific wiring diagrams or instructions I should follow for my specific lawn mower make and model?
Yes, specific wiring diagrams and instructions may be available for your lawn mower make and model. The best place to find these resources is in the owner’s manual or service manual for your lawn mower.
The owner’s manual should provide you with general information on your lawn mower’s wiring and electrical system. It may also include a basic wiring diagram or instructions for ignition switch replacement.
If you need more detailed information, such as specific wiring diagrams or instructions, the service manual for your lawn mower may be a better resource. These manuals are typically available from the manufacturer or from third-party sources.
In addition to the manuals, you may also find helpful resources online. Many manufacturers and third-party websites provide wiring diagrams and instructions for lawn mower models. However, it’s essential to ensure that any information you find online is from a reputable source and pertains specifically to your lawn mower make and model.
It’s important to follow the correct wiring diagrams and instructions to ensure that the ignition switch is installed correctly and safely. Incorrect wiring can cause damage to your lawn mower or result in injury to yourself.
Is it worth it to wire a new ignition switch, or should I consider purchasing a new lawn mower altogether?
Whether it’s worth it to wire a new ignition switch or purchase a new lawn mower altogether will depend on several factors, such as the age and condition of your lawn mower and the cost of the ignition switch and installation.
If your lawn mower is relatively new and in good condition, replacing the ignition switch may be cost-effective. In this case, you can purchase a new ignition switch and wire it yourself or have it installed by a professional.
However, if your lawn mower is old and in poor condition, it may be more cost-effective to purchase a new lawn mower altogether. This will provide you with a new ignition switch, other updated features, and improved performance.
When deciding whether to replace the ignition switch or purchase a new lawn mower, it’s important to consider each option’s overall cost and benefits. It would be best if you also considered the frequency of repairs and maintenance required for your current lawn mower, as this can help you determine whether it’s worth investing in repairs or purchasing a new one.
Ultimately, the decision will depend on your personal preferences, budget, and the specific circumstances of your lawn mower. If you’re unsure which option is best for you, it’s a good idea to consult with a lawn mower repair professional or a reputable dealer for advice.
How long does it take to wire a lawn mower ignition switch?
The time it takes to wire a lawn mower ignition switch will depend on several factors, such as the specific make and model of your lawn mower, your level of experience with electrical work, and whether you encounter any issues during the process.
Generally, wiring a lawn mower ignition switch can take anywhere from 30 minutes to a few hours. If you’re an experienced DIYer and have all the necessary tools and parts on hand, you may be able to complete the job in 30-60 minutes.
However, if you’re new to wiring or encounter any issues during the process, such as wiring mistakes or faulty parts, it may take longer to complete the job. In this case, it’s important to take your time, follow the instructions carefully, and seek help if you’re unsure about any aspect of the wiring process.
It’s also worth noting that some lawn mower ignition switches may be more complex than others and may require more time and expertise to install. If you’re not confident in your ability to wire the ignition switch yourself, it may be best to seek professional help to ensure that the job is completed safely and correctly.
Can I wire a lawn mower ignition switch if I have no prior electrical experience?
While it’s technically possible to wire a lawn mower ignition switch without prior electrical experience, it’s not recommended. Electrical work can be dangerous, and incorrect wiring can injure yourself or damage your lawn mower.
Suppose you’re interested in wiring a lawn mower ignition switch but have no prior electrical experience. In that case, it’s essential to take the necessary precautions and seek guidance from a professional or an experienced DIYer. Consider enlisting the help of a friend or family member who has experience with electrical work or consult with a lawn mower repair professional.
It would be best if you also took the time to familiarize yourself with the basics of electrical work, such as how to use a multimeter and read wiring diagrams. Additionally, ensure you have the right tools and equipment, including wire strippers, crimping pliers, and electrical tape.
If you decide to wire the ignition switch yourself, take your time, follow the instructions carefully, and double-check your work before turning on the engine. And if you encounter any issues or have any doubts about the wiring process, don’t hesitate to seek help from a professional.
How do I troubleshoot if my lawn mower still won’t start after wiring a new ignition switch?
If your lawn mower still doesn’t start after wiring a new ignition switch, other underlying issues may need to be addressed. Here are some troubleshooting steps to help you identify and address the problem:
- Check the battery: A dead or weak battery can prevent your lawn mower from starting. Use a multimeter to test the battery voltage and ensure that it’s within the recommended range.
- Inspect the spark plug: A faulty one can also prevent your lawn mower from starting. Remove the spark plug and inspect it for signs of wear or damage. If necessary, replace the spark plug with a new one.
- Check the fuel system: Make sure your lawn mower has enough fuel and that the fuel system is functioning properly. Check the fuel lines, fuel filter, and cleaning carburetor for any signs of blockage or damage.
- Test the solenoid: The solenoid transmits electrical current from the battery to the starter motor. Use a multimeter to test the solenoid and ensure it functions properly.
- Inspect the wiring: Check the connections between the ignition switch, battery, solenoid, and starter motor. Make sure all connections are secure and free from corrosion or damage.
- Consult the manual: If you’re still unable to identify the problem, consult the owner’s manual for your lawn mower or seek help from a professional lawn mower repair service.
Remember always to take safety precautions when troubleshooting your lawn mower. Disconnect the spark plug wire and use caution when working with electrical components to avoid injury.
Should I disconnect the battery before wiring the ignition switch?
Yes, disconnecting the battery before wiring the ignition switch on your lawn mower is always a good idea. Disconnecting the battery ensures no electrical current is running through the system, which can help prevent injury or damage to your lawn mower.
To disconnect the battery, locate the negative terminal on the battery and use a wrench or pliers to loosen the nut holding the cable in place. Once the nut is loosened, carefully remove the cable from the terminal and tuck it away from any metal surfaces on the lawn mower.
It’s also a good idea to cover the disconnected battery terminal with electrical tape to prevent accidental contact while working on the wiring. Once you’ve finished wiring the ignition switch, reattach the battery cable and tighten the nut to secure it in place.
Remember, safety should always be your top priority when working with electrical components on your lawn mower. Always wear appropriate safety gear and take precautions to prevent injury or damage to your equipment.
Can I purchase a universal ignition switch, or need a specific switch for my lawn mower make and model?
You may be able to purchase a universal ignition switch for your lawn mower. Still, it’s generally recommended that you use a specific ignition switch that’s designed for your lawn mower make and model.
Using a specific ignition switch ensures that the switch will fit properly and that the wiring connections will be compatible with your lawn mower’s electrical system. Additionally, the recommended switch can help ensure your lawn mower operates safely and effectively.
Before purchasing a replacement ignition switch, check your lawn mower’s owner’s manual or contact the manufacturer to determine the specific part number and specifications that you need. This can help ensure that you purchase the correct replacement part for your lawn mower
What are the differences between a two-wire and four-wire ignition switch?
The main difference between a two-wire and four-wire ignition switch is the number of circuits that they control.
A two-wire ignition switch has two circuits – a power and ignition circuits. The power circuit connects the battery to the electrical system, while the ignition circuit controls the ignition coil and the spark plug. When the key is turned to the “on” position, the power circuit is completed, and when the key is turned to the “start” position, the ignition circuit is completed, allowing the engine to start.
A four-wire ignition switch has four circuits – a power circuit, an ignition circuit, an accessory circuit, and a starter circuit. In addition to controlling the power and ignition circuits, a four-wire switch also allows you to control additional accessories, such as lights or a charging system, and a starter motor circuit to engage the starter when you turn the key to the “start” position.
The type of ignition switch you need for your lawn mower depends on your specific model and the electrical system it uses. If you’re unsure about which type of switch to use, consult your lawn mowers owner’s manual or contact the manufacturer for guidance.
Final Words
Wiring a lawn mower ignition switch may seem daunting at first, but with a little patience and some basic knowledge of electrical wiring, it can be done in just a few simple steps. Follow these steps carefully, and your lawn mower will be up and running quickly. It’s important to remember to take safety precautions, such as turning off the lawn mower before starting any work and double-checking your connections before testing the ignition switch.
If you encounter any issues during the process or need clarification on any steps, consult your lawn mower’s manual or consider seeking the help of a professional. Working with electricity can be dangerous, so it’s better to err on the side of caution.
Wiring a lawn mower ignition switch is a relatively simple task that can save you time and money by allowing you to fix the problem yourself. With these steps and a little patience, you can have your lawn mower up and running in no time, ready to tackle those overgrown lawns and keep your yard looking neat and tidy.

I love gardening and hope you enjoy reading my post as much as I enjoy writing it. I focus on plant-based living and believe that you will be healthier and happier by incorporating more plant-based foods into your diet. By providing helpful tips and advice on everything from garden design to growing techniques, I want to help make gardening easier for everyone.